DTF transfer starter kit options make home customization approachable for DIY designers. A well-chosen kit puts the essential tools and supplies in your hands, so you can start creating high-quality designs without a shop full of equipment. This introductory guide highlights what to look for and offers budget tips for DTF that help you stretch every dollar. You’ll learn a simple workflow to print, powder, press, and reveal vibrant transfers with confidence using reliable printing supplies. By the end, you’ll know how to pair the right transfers with a sensible setup that fits your budget and project goals.
A direct-to-film setup for home sewing and apparel projects uses a film substrate, adhesive powder, and a heat source to carry vivid imagery to fabric. This film-based transfer workflow covers design, digital printing, powder application, curing, and pressing, without requiring large industrial equipment. For newcomers, think of a starter bundle for fabric customization that combines a printer capable of DTF, PET film sheets, adhesive powder, and a compact heat press. By reframing the process in these terms, you can focus on the core steps—design, print, powder, cure, and press—while exploring different fabrics and finishes.
DTF transfer starter kit Essentials: From Design to Finish
A DTF transfer starter kit is the gateway to professional-looking prints at home. It bundles the core tools and supplies you’ll rely on for the full workflow—from printing to curing and pressing—so you can focus on design rather than chasing individual components. By understanding what makes up quality DTF printing supplies and how they fit with DTF transfers, you’ll set a solid foundation for your projects and avoid common incompatibilities.
Choosing a starter kit is about balance: you want reliable inkjet printing capability, durable PET film, effective adhesive powders, and a dependable heat source. With this kit, you’ll also gain insights into how to pair the right DTF transfers with compatible printing supplies, ensuring crisp edges, vibrant colors, and a soft hand-feel on cotton, blends, and synthetics. This approach aligns with a practical DTF starter guide designed for beginners who want predictable results without showroom-level gear.
Understanding DTF Transfers and the Importance of a Starter Kit
DTF transfers start with Direct-to-Film printing: designs are printed onto PET film, dusted with an adhesive powder, cured, and then pressed onto fabric. The result is bright color, smooth gradients, and durable adhesion that holds up to washing. A DIY-friendly mindset helps you adapt this workflow to your space, but it does require a thoughtful selection of supplies and a clear process.
A solid understanding of the starter kit concept helps you plan for scale and quality. The kit’s core components—from a printer compatible with DTF workflow to solvent-free cleaning tools—determine how smoothly your projects progress. When you know what to expect, you can compare DTF printing supplies, assess compatibility with your fabrics, and chart a path that minimizes waste and time spent troubleshooting.
Budget Tips for DTF: Stretching Your Kit Without Sacrificing Quality
Smart budgeting for DTF means prioritizing the items that most influence color, adhesion, and consistency. Start by choosing a reliable heat press and a printer setup that’s compatible with DTF powders and films. Investing here pays dividends in every batch, while you experiment with different designs and fabrics.
To maximize value, look for bundled kits, refurbished equipment from reputable sources, and quantity-conscious purchases of consumables. Plan projects around common apparel materials and reserve a portion of your budget for high-quality PET film and powder adhesive, which have the biggest impact on durability. This approach aligns with practical budget tips for DTF and helps you build a scalable, cost-effective workflow.
From Print to Press: The DTF Printing Workflow with Quality Supplies
A smooth DTF workflow hinges on reliable DTF printing supplies and a consistent process: print on film, powder and cure, then press onto fabric. Each step matters for color fidelity, edge sharpness, and transfer durability, so having a steady kit reduces variables and increases your chances of success.
In practice, the workflow emphasizes preparing the design, calibrating colors, and maintaining the printer and press. Using a well-chosen set of DTF transfers and compatible supplies helps you reproduce designs with confidence, delivering results that resemble professional work and justify your investment in a dedicated DTF starter guide.
Maintenance, Troubleshooting, and Quality Control for DIY DTF
Even with a complete starter kit, issues can arise. The key is to monitor color consistency, adhesion strength, and edge fidelity. Regular calibration, proper pre-pressing, and careful curing reduce ghosting, peeling, and color shifts—problems that undermine the reliability of your DIY DTF projects.
Develop a simple routine for cleaning and maintenance, label powders, and keep spare parts on hand to minimize downtime. A dedicated DTF starter guide can help you diagnose problems quickly, and focusing on quality control—along with sound budget and workflow practices—will keep your projects on track as you refine your skills in DTF transfers.
Frequently Asked Questions
What is a DTF transfer starter kit and why is it essential for DIY heat transfer projects?
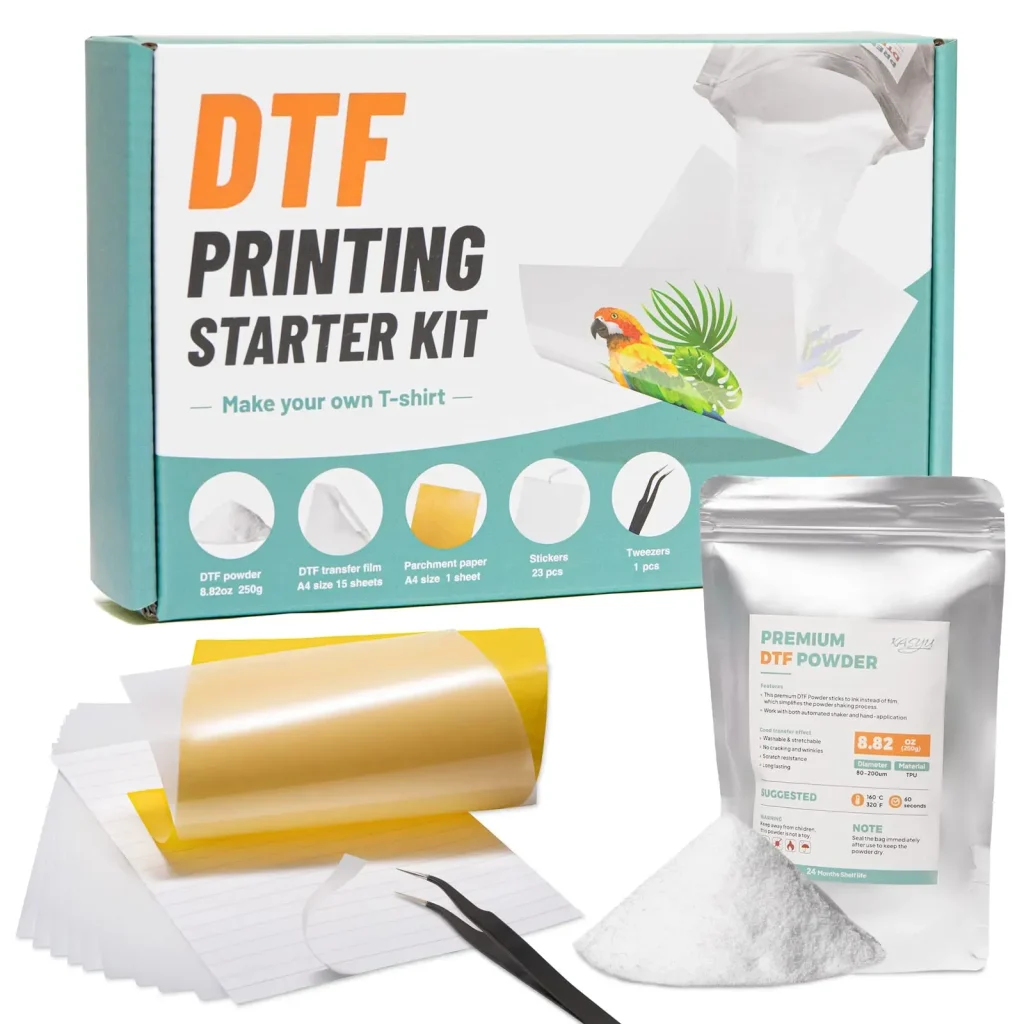
A DTF transfer starter kit is a curated set of the essential tools used to create DTF transfers at home. It typically includes a printer compatible with DTF workflow, DTF film, pigment adhesive powder, a curing method, a heat press, protective sheets, and basic trimming and cleaning tools. With these DTF printing supplies, you can print, powder, cure, and press high-quality transfers for DIY heat transfer projects without a full shop. This setup helps ensure consistent results and a practical path from idea to finished garment.
What are the essential DTF printing supplies to include in a starter kit?
The essential DTF printing supplies in a starter kit include a printer compatible with the DTF workflow, DTF film sheets, pigment adhesive powder, a curing/drying capability, a reliable heat press, protective silicone or teflon sheets, and basic application and cleaning tools such as a spreader, scraper, lint-free cloth, and isopropyl alcohol. Having solid DTF printing supplies supports accurate color, clean edges, and strong adhesion across common fabrics.
What are budget tips for DTF when building your DTF transfer starter kit?
Budget tips for DTF start with a basic, reliable heat press and consider refurbished gear from reputable sources. Look for bundled starter kits that combine printer settings, films, powders, and some transfer sheets at a discount. Prioritize quality where it matters most—PET film, powder, and a stable heat source—and buy consumables in small quantities to test compatibility before larger purchases. Plan projects around cotton and blends to maximize versatility without over-spending.
Can you outline the DTF starter guide workflow for DIY heat transfer from design to finish?
DTF starter guide workflow: design and print on DTF film with calibrated colors, allow the film to dry if needed, evenly dust the printed area with adhesive powder and spread for uniform thickness, cure the powder, trim the transfer, pre-press the garment to remove moisture, place the transfer printed side down on the garment, cover with a silicone/teflon sheet, press at the recommended temperature and time with even pressure, and finally peel when cool. This provides a clear, repeatable process for DIY heat transfer using DTF transfers.
What common issues might arise with DTF transfers when using a starter kit, and how can you troubleshoot them?
Common issues include color mismatch (calibrate printer color profiles and verify film stock), poor adhesion (ensure proper curing and pre-press), ghosting or faint edges (check film tension and moisture control), and peeling after washing (confirm fabric compatibility and correct post-press care). Troubleshooting these typically involves adjusting color management, curing steps, press settings, and selecting compatible fabrics, all of which are supported by reliable DTF printing supplies and a solid DTF transfer starter kit.
| Aspect | Key Points |
|---|---|
| DTF transfer concept and starter kit concept | DTF stands for direct-to-film. The process prints your design onto PET film, dusts with adhesive powder, cures the powder, and presses the transfer onto fabric. When done correctly, DTF transfers deliver vivid color, soft hand-feel, and durability across cotton, blends, and many synthetics. A DIY-friendly starter kit includes the core components you rely on most. |
| What goes into a DTF transfer starter kit |
|
| Budget tips |
|
| Steps to complete a DTF transfer |
|
| Fundamental DTF printing supplies and why they matter |
|
| Tips for choosing a DTF starter kit that fits your needs |
|
| A look at DIY heat transfer and how DTF compares |
|
| Quality control and troubleshooting for beginners |
|
| Maintenance and care for your DTF starter kit |
|
Summary
DTF transfer starter kit is a practical entry point for anyone who wants to create professional-looking designs at home while keeping costs under control. By focusing on essential items, prioritizing reliable DTF printing supplies, and following a clear workflow, you can achieve consistent results that rival professional shops. As you gain experience, you can expand your kit, experiment with different fabrics, and refine your color management. Whether you’re printing for personal projects or starting a small business, the combination of a well-chosen starter kit, solid techniques, and ongoing learning will help you master the art of DIY DTF transfers.